![]()
ViewCam
User Manual
Written by Ben Bird - Ben Software Ltd
ViewCam allows you to view live video and audio from IP cameras. It works with virtually all IP cameras on the market, including ONVIF devices, and has features such as instant replay, image capture, group windows, audio streaming, and Pan/Tilt/Zoom control.
The main features of ViewCam are:
Video Windows
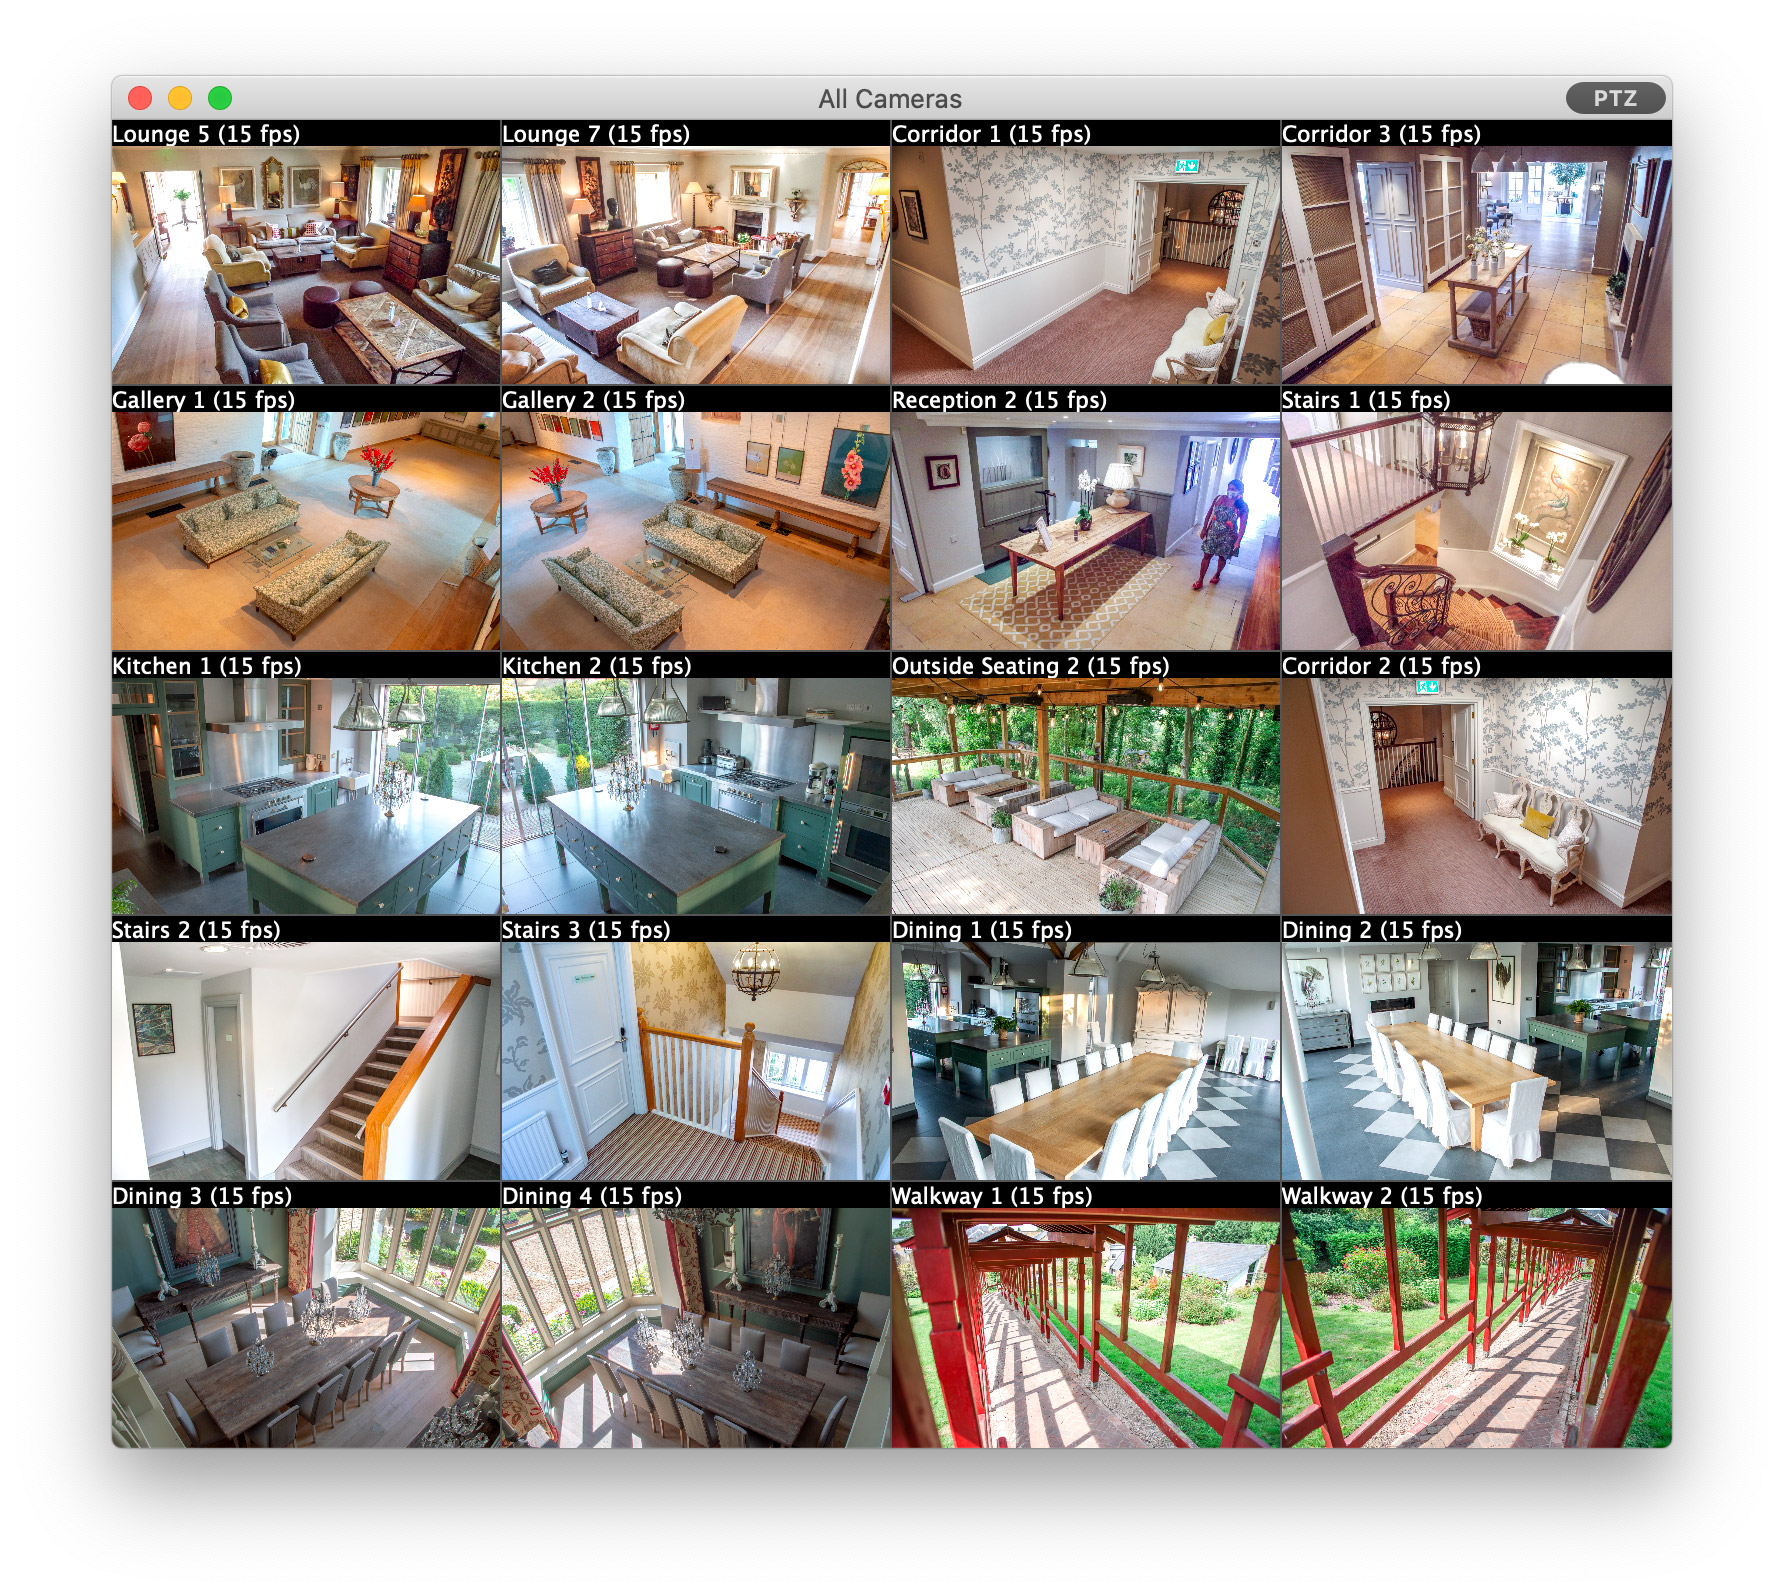
ViewCam's main All Cameras window shows live video streams from all configured cameras in a grid view. You can also create Group windows that contain particular groups of cameras — useful in larger installations to organise cameras into logical collections.
In addition, each camera can be displayed in its own individual video window. You can open individual camera video windows from the Window menu, or by double-clicking on a camera's live image in the main video window or Group window. All video windows can be resized to any shape and size by dragging any side.
ViewCam offers digital Pan/Tilt/Zoom control for any camera in any video window: hold the Command key (⌘) on your keyboard and scroll up or down on your mouse or trackpad (on a trackpad, use the two-finger gesture to scroll). Once zoomed in, release the Command key and scroll in any direction to pan around the image.
Here is a summary of the functionality of video windows:
Instant Replay
The instant replay feature keeps a buffer of frames from each camera in memory, which is available for instant playback or capture at any time. Because this feature can use significant RAM, it is off by default, but can be enabled via Settings - General. To start an instant replay session, right-click on a live video image and select Start Instant Replay, or hold the Command key and scroll left on a live video image. During an instant replay session, the video window will look like this:
During the replay session, hold Command and scroll left/right, or click and drag the yellow indicator, to go backwards/forwards in time. Options to save individual images, as well as the whole video buffer as a movie file, are available by right-clicking on the image.
Note that, during a replay session, the removal of old frames is suspended, but new frames are continually being added, so the longer a replay session continues the more RAM it will use.
Customising Display Layouts
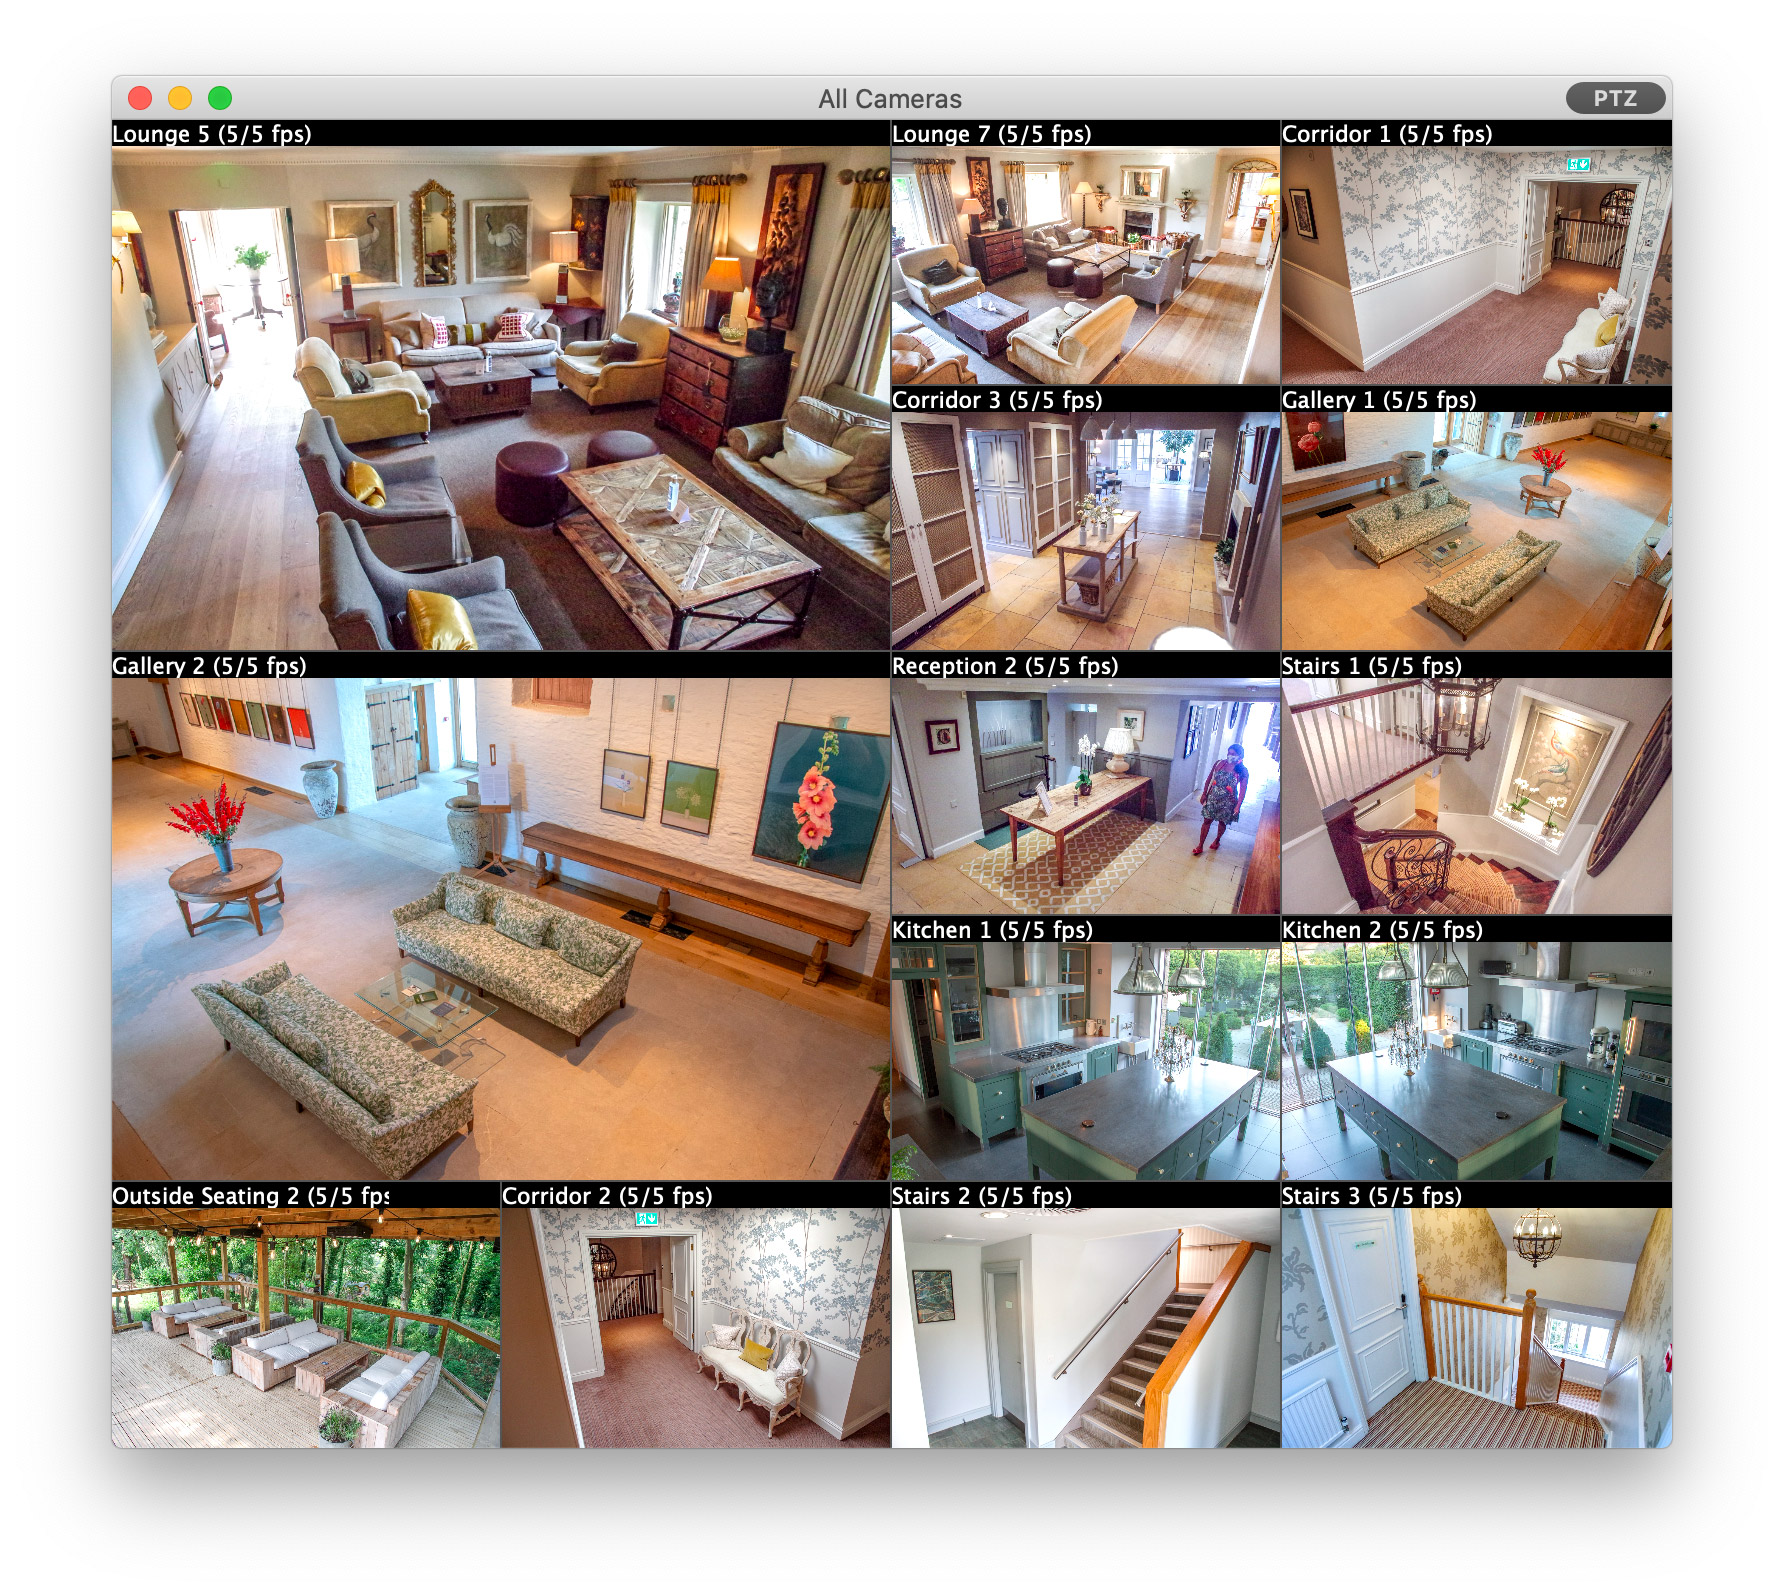
Each video window is laid out in a grid, with each camera occupying one grid square by default. You also have the option of setting particular cameras to display at larger sizes - for example, a camera can be set to occupy three grid squares wide by two grid squares high. This can be set via the options in the contextual menu that appears when you right-click (or Control-click) a camera's live view:
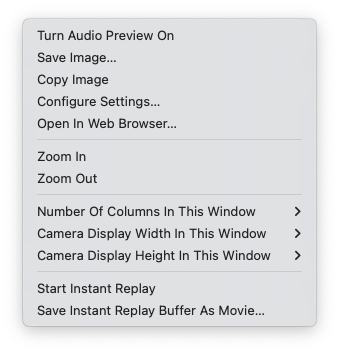
Use the options Camera Display Width In This Window and Camera Display Height In This Window to set the size of each camera's live view. Each video window has its own independent layout that can be set in this way.
By default, ViewCam automatically chooses an optimum number of columns for the layout grid, based on the size of the window and the resolutions of the cameras. This can change as the window is resized; instead, to ensure that cameras remain in fixed positions, you can use the Number Of Columns In This Window option to set a fixed number of columns.
If the size you request for a particular camera would take its view beyond the right or bottom edge of the window, its view size is reduced to fit, so you will get a smaller size than you request. You can change the order of the cameras by dragging them up and down in the list on the left under Settings - Cameras to ensure that each camera has enough space to display at the requested size.
Here is a simple example showing two cameras displayed at double size:
For each camera, ViewCam offers a Camera Control window that allows you to:
To open a Camera Control window, click the button (with icon ![]() ) in the title bar of video windows, or right-click on a camera and select the Control Camera... option, or hold the alt/option key on the keyboard while double-clicking a camera's live image.
) in the title bar of video windows, or right-click on a camera and select the Control Camera... option, or hold the alt/option key on the keyboard while double-clicking a camera's live image.
Note that cameras typically require administrator access for these controls, so make sure these details have been entered correctly under Settings - Cameras. Non-admin accounts, for simply viewing live video, may not be sufficient for camera control.
PTZ
Under this section, you can control the camera's pan/tilt position and zoom level:
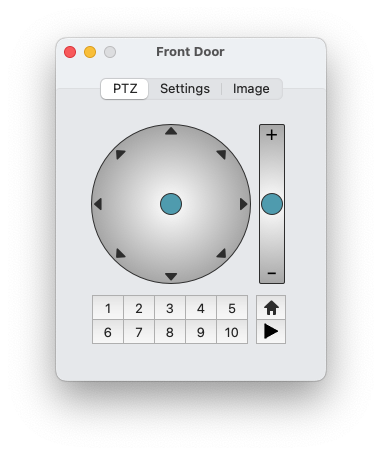
The controls act as virtual joysticks, allowing you to control direction, as well as speed of movement for cameras that support variable-speed movement (the further you move the blue indicators from the centre of their respective control areas, the faster the movement).
If your camera supports preset positions, the preset buttons will be available. To save the current position of the camera as one of the presets, hold the alt/option key on the keyboard and click a preset button. Note that the Home position, if available, is typically pre-set by the manufacturer and cannot be changed.
Keyboard Shortcuts — use the arrow keys or the numeric keypad on the right of standard keyboards (1 on the keypad corresponds to down-left and so on). For cameras that support variable-speed movement, hold the shift key with these keyboard shortcuts to move the camera 50% faster than standard speed. Recall presets by pressing a number key at the top of the keyboard, or hold alt/option with a number key to save a preset.
(Note that these keyboard shortcuts are also available in video windows, even without the Camera Control window open: simply click once on the live image of a camera you want to control, and you can then use them.)
Mouse shortcuts — hold the shift key (or enable caps lock), and click directly in a camera's image in any video window: a click on the right side of the video image will move the camera right and so on. If your camera supports variable-speed movement, the distance of the click from the centre of the image defines the speed of movement.
Settings
This section contains settings related to PTZ:
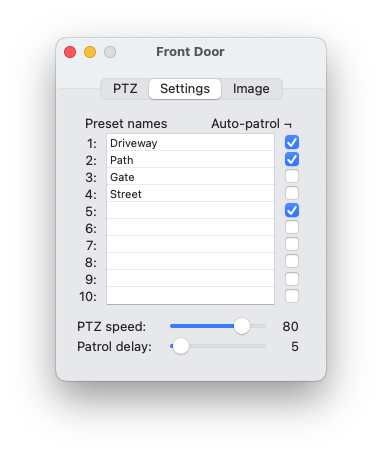
Here you can name each preset, set up auto-patrol, and adjust the movement speed (if your camera supports variable-speed movement).
Auto-patrol — select which presets to include in auto-patrol using the checkboxes, and choose your preferred delay setting, which is the number of seconds between automatic movements. Then, to start auto-patrol, click the play button (►) in the PTZ section. While auto-patrol is running, the camera will automatically move between the selected presets in an indefinite loop. If you move the camera manually during this time, auto-patrol is temporarily suspended and will automatically resume 20 seconds after the last manual input.
Image
Here you will find controls related to camera imaging:
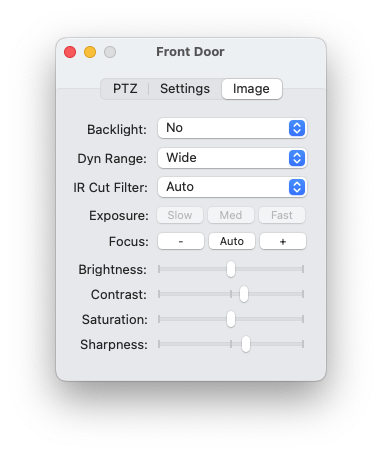
These controls are available for ONVIF cameras only, and support varies between cameras; if an item here is unavailable, this means that the camera does not support its adjustment.
Any changes to these image controls are set permanently in the camera.
SecuritySpy is our NVR (Network Video Recording) software that runs on any Mac and allows users to create powerful video surveillance (CCTV) systems. ViewCam is ideal for viewing live video from SecuritySpy on another Mac.
To set up one Mac (the server) to transmit live video to another Mac (the client):
On the server MacThere are two ways to add cameras to the ViewCam client instance:
On the client Mac: adding all cameras in one goNotes:
The Settings window contains all configuration options for the software, organised as follows:
Note that changes to Settings are not applied immediately as you interact with the controls in this window as this may cause interruptions in the video streams. Instead, use the Save option in the File menu (Command-S on the keyboard), or click the Apply Settings button in the top right corner of the window, to apply any changes you make.
This section contains general-purpose settings to configure the software:
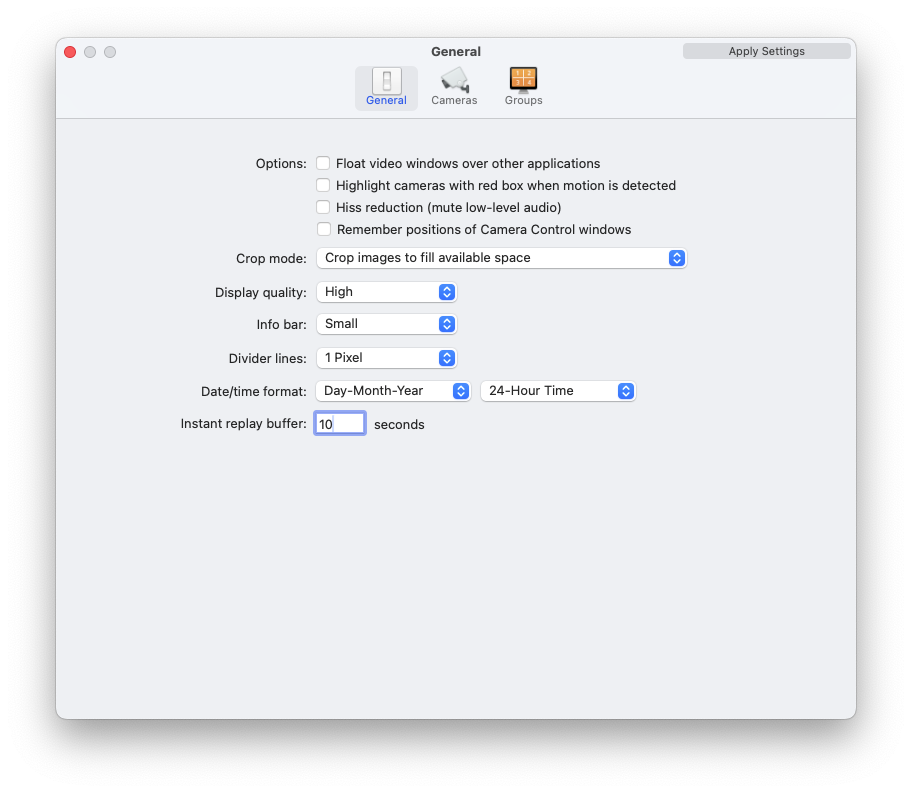
Options - Float video windows over other applications
When enabled, all of ViewCam's video windows (the All Cameras window, Group windows and individual-camera video windows) will appear over the windows of other applications, even when ViewCam is in the background.
Options - Highlight cameras with red box when motion is detected
If there is a moving object in a camera's video image, a red box will be drawn around the camera's view in all video windows.
Options - Hiss reduction
When enabled, low-level audio will be silenced, eliminating hiss and background noise from microphones. This is useful for applications such as baby monitoring, where you may be listening to the audio at night, or when multiple cameras are playing audio at the same time.
Options - Remember positions of Camera Control windows
By default, Camera Control windows open at the current mouse cursor position. Enable this option to maintain their position instead.
Crop mode
In video windows, each camera is allocated a rectangle in which to show its image, and this rectangle may not match the aspect ratio of the video being delivered by the camera. To display each camera at its correct aspect ratio, you can choose to use black bars at the top/bottom or left/right edges, or you can choose to crop the image so that it fits perfectly inside its allocated rectangle without black bars. As a third option, you can choose to stretch the video to avoid the need for either cropping or black bars. Mild cropping or stretching both result in a more visually pleasing look than black bars, especially when there are cameras with varying aspect ratios.
Display quality
There are often large differences between the size of the source images and the size at which they are displayed on the screen, so a scaling algorithm needs to be used in order to prepare the images for display. This quality setting determines the sophistication of this scaling algorithm: the higher the setting, the better the images will look (less jagged with more preserved detail), but the greater the processing load on your Mac's GPU. Activity Monitor can be used to determine whether the GPU is overworked or whether it has spare capacity.
Info bar
The info bar at the top of each camera's view shows various details like the camera name, incoming video frame rate, display frame rate, and audio indicators. This option allows you to choose the size of the info bar, or turn it off completely.
Divider lines
Lines are shown between adjacent camera views in all video windows - this option specifies their thickness.
Date/time format
The format set here will be used to generate automatic file names when saving image or movie files.
Instant replay buffer
This feature keeps a buffer of recent video frames in memory for each camera, which is then available for replay at any time in video windows. Note that specifying a long duration here can use significant RAM. See Live Video for information on how to use this feature once it has been enabled here.
The Cameras section allows you to add and configure your cameras:
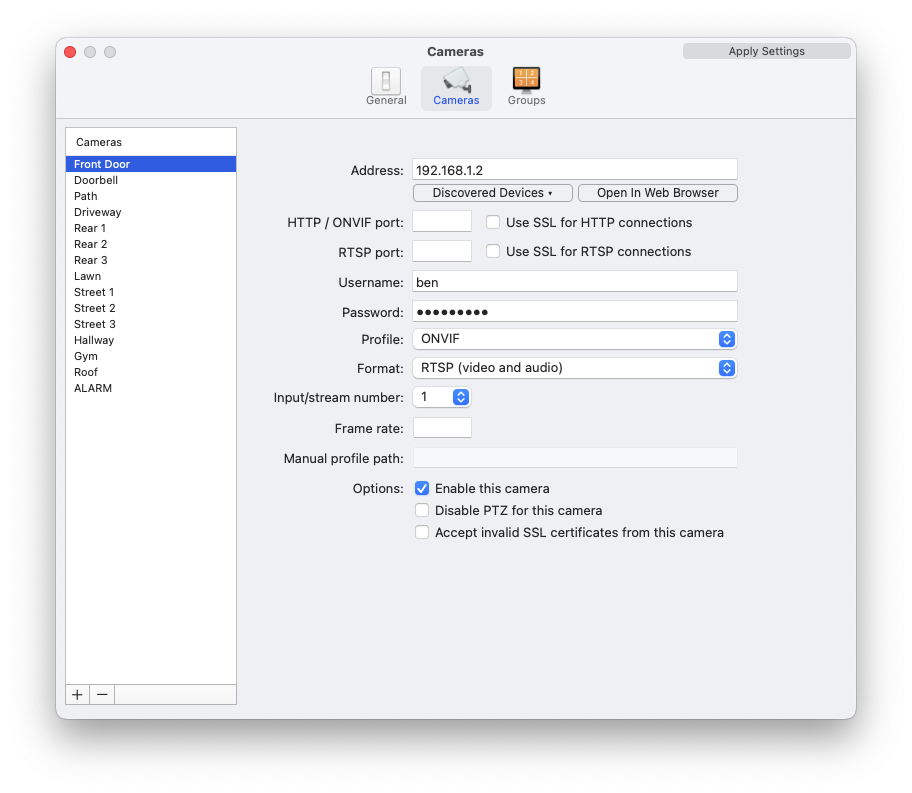
Address
Enter the IP address, hostname, or Bonjour address of the device. By clicking the Discovered Devices button below this field, ViewCam will display a list of devices that were discovered on your local network, for example:
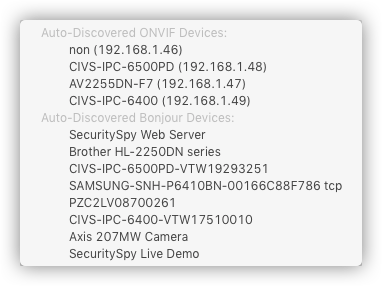
Select a device from this list, and the Address field will be automatically populated with the address of the selected device. This menu consists of two sections:
Both the above addressing methods remove the need to configure your cameras with fixed IP addresses: for a camera that obtains an IP address automatically via DHCP (which is usually the case), setup is simply a case of connecting it to your network and selecting it in the above list.
Many cameras support both ONVIF and Bonjour, so you may see two entires in the list for such devices; in this case you can select either (though using the ONVIF address may be slightly faster and more reliable in some circumstances).
In this menu, you will see a check mark (tick) next to devices that have already been added.
Not all cameras can be discovered automatically - in this case, use our Network Device Finder utility to find the camera. Then, log on to the camera with a web browser (e.g. Safari) and configure it with a static IP addresses on your local network, which you can then use in ViewCam.
HTTP/RTSP ports
These are the network ports that ViewCam uses to connect to the device. The standard ports, which are used by most cameras, are 80 for HTTP and 554 for RTSP. If your device uses standard ports, you can leave these fields empty, but if it uses non-standard ports, you should enter them here.
Use SSL
These checkboxes control whether to attempt a secure connection to either the HTTP port or the RTSP port. Enable these options only if the network device supports secure connections (most IP cameras do not by default).
Username / Password
If the network device requires authentication, enter its username and password here.
Profile
Most IP surveillance products sold in the last few years implement the ONVIF protocol, which is a universal way of communicating with IP cameras. So, if your camera supports this, then you should use the ONVIF profile here. Alternatively, ViewCam has many profiles designed specifically for individual camera makes and models, so check this list to find one to match your device. Or, if you want to enter the HTTP/RTSP streaming request yourself, use the Manual configuration option.
Format
This menu lists the available formats supported by the network device, which will be a combination of the following:
If you are connecting to a camera over a local network, then the H.264/H.265 RTSP formats are typically the best ones to use. If connecting over the internet, then the H.264/H.265 RTSP-over-HTTP format are most appropriate, if supported by your camera.
Input/stream number
For devices that have multiple inputs or streams, here you can specify the one you want to use. For example, some devices have multiple physical inputs or image sensors, while others have multiple streams with different compression settings. This option will only be available if this feature is supported by the device.
Frame rate
Enter the frame rate at which you want the device to send video frames. This setting is not available for all devices; typically you will need to configure the device directly to set its frame rate.
Manual profile path
This setting is available when you select Manual Configuration as the profile. This is the text that is sent to the device to instruct it to send media data. This setting is useful if you want to use a network device that doesn't support ONVIF, and isn't supported under an existing profile. Consult the documentation or manufacturer of your device for information about the format of RTSP requests it understands.
When camera manuals specify this information, they typically do so in the form of a URL, like this:
rtsp://address:port/path
It's specifically the path part that needs to be entered here. If a port is also specified, make sure to also enter this in the RTSP Port box.
This section allows you to specify groups of cameras that can be displayed via their own Group windows. For large numbers of cameras, organising them into logical groups in this way makes viewing them much more manageable.
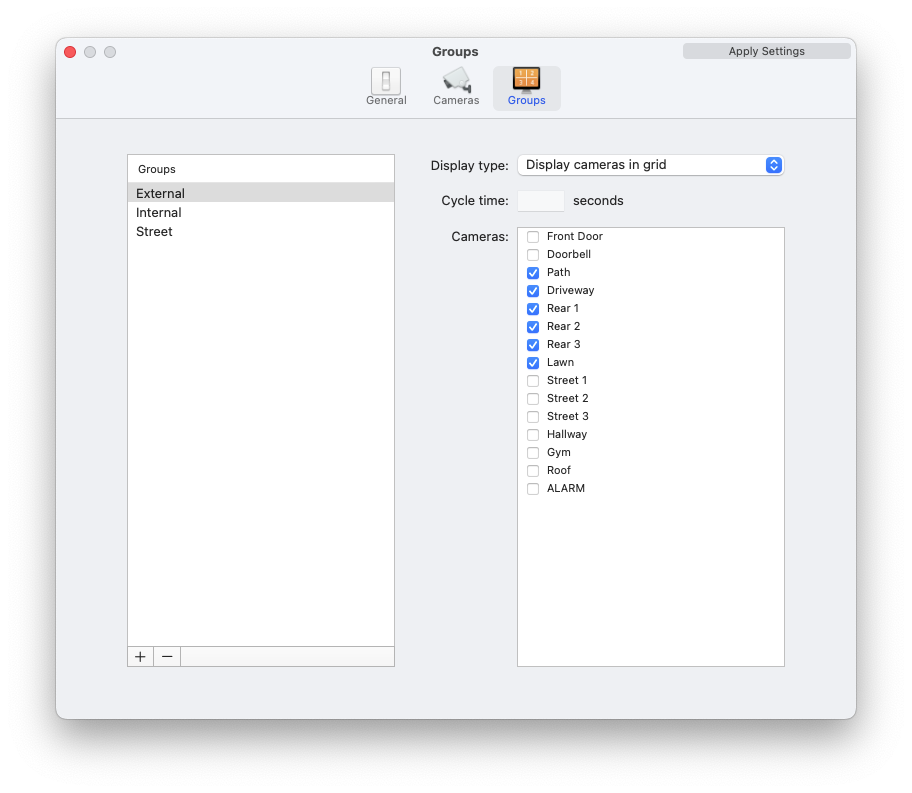
Display type
Choose how you want cameras to appear in the Group window:
Display cameras in grid - just like the All Cameras window, the Group window will display all its member cameras at once, in a grid arrangement.
Cycle between each camera - this option will display one camera at a time, sequentially.
Cycle between groups of four cameras - this option will display four cameras at a time, sequentially in groups of four.
Cycle time
Specify the number of seconds between cycles, when using either of the Cycle display options.
Cameras
Simply enable the checkbox next to each camera you want to include in the group.
If there was a problem connecting to a particular camera, a summary of the error will be shown in the video windows. For a more detailed description of what went wrong, see the Log window, which is available from the Window menu at the top of the screen.
If you have any question or if you require direct help, you can email us at support@bensoftware.com.